You are using an out of date browser. It may not display this or other websites correctly.
You should upgrade or use an alternative browser.
You should upgrade or use an alternative browser.
Velos Rotors 880 Rebuild
- Thread starter Heliman450
- Start date
 I hope the rest of the build goes smoothly for you. That's going to be one badass Heli
Heliman450
Well-Known Member
The job list looks like this:
- Replace the chassis rails and increase the width from 102mm to 103.5mm and trim to the finished length
- Cut a locating slot in the tail boom
- Fit the tail boom with its servo, tension the tail rotor drive belt, shorten and fit the push rod
- Clean all screw fittings and apply thread seal
- Replace the connection to the 2S battery, finalise the power supply cables to the ESC's and solder new connections to/from them
- Power-up the gyro and run through the setup (probably not much to change)
- Check the DoR for the motors and colour code appropriately
- Calibrate the throttle to the ESC's
- Carry out test flight
- Begin the 'beautification' process - replace temporary battery trays and ESC mounting plates - canopy repair or replacement
- Longer term project to replace landing gear with retractable wheels
Heliman450
Well-Known Member
Hi all, latest update is that the maiden flight has taken place and was successful in so much as my Phoenix v1.4 took to the air and was looking good. However, the tension on the tail rotor drive belt began to loosen. My resulting landing was a bit too hard and the landing gear failed its hard landing test  shearing cleanly at the front cross-piece.
Good news is that only the landing gear is useless and I've ordered a new set from a scale Bell 47GIII weighing in at 13.5kg against a current RTF weight of 9.7Kg so there should be a bit of insurance there. The biggest challenge will be mating it to the chassis as I'm sure it will be significantly bigger as I was unable to obtain dimensions. I'm sure that it will look a bit odd due to its form as shown if you follow the link below:

 www.modellhubschrauber.ch
Delivery time is 1-2 weeks.
shearing cleanly at the front cross-piece.Good news is that only the landing gear is useless and I've ordered a new set from a scale Bell 47GIII weighing in at 13.5kg against a current RTF weight of 9.7Kg so there should be a bit of insurance there. The biggest challenge will be mating it to the chassis as I'm sure it will be significantly bigger as I was unable to obtain dimensions. I'm sure that it will look a bit odd due to its form as shown if you follow the link below:
Skid landing gear for Bell 47 G III
Delivery time is 1-2 weeks.
 As long as it works
 ") .
.Heliman450
Well-Known Member
Hi D.O.G., beauty is in the eye of the beholder as the saying goes. I only mean 'odd' it in the context that the landing gear is from a helicopter with a goldfish bowl up front and it will be mated to quite a narrow body (102.5mm at its widest). The upper frame is 66.4mm wide, hence, my feeling.
The only dimension I have is that the cross-pieces are from 15mm diameter aluminium tubing so strength shouldn't be a problem.
The only dimension I have is that the cross-pieces are from 15mm diameter aluminium tubing so strength shouldn't be a problem.
Heliman450
Well-Known Member
Hi all, the new landing gear has arrived much quicker than I thought  it looked huge! It's now undergoing a size reduction operation and will be more in proportion to the body and still much stronger than the previous version. Now just a bit of tidying up before receiving the latest update.
it looked huge! It's now undergoing a size reduction operation and will be more in proportion to the body and still much stronger than the previous version. Now just a bit of tidying up before receiving the latest update.
Heliman450
Well-Known Member
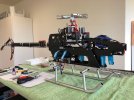
Hi again, at long last I can close the chapter on my rebuild project to get the surviving elements of my Velos Rotors 880 back into the air. Renaming it Phoenix, the size is probably 862.5 after the loss of some tail boom in the very hard 'landing' 
The rear area of the body needed some work to give adequate grip to the tail boom as it was loosening off a bit during its initial test flight. I also replaced the original pinch-bolts to avoid the possibility that the threads were worn adding to the problem. The guy who altered the landing gear didn't take note of my requirement for the front uprights to be shorter than the rear. I was aiming for a tilt of 2 degrees to lift the tail fin to be 60mm above the ground. It's actually 70mm so no problem there. However, the heli is now noticeably taller and doesn't work with my current arrangement for transport in my van. That's a minor problem in the greater scheme of things.
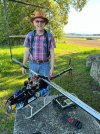
Here are a couple of photos, one with the heli sitting loosely on the new landing gear and the other of yours truly following the successful test. Next project will be beautification (the heli not me).
The rear area of the body needed some work to give adequate grip to the tail boom as it was loosening off a bit during its initial test flight. I also replaced the original pinch-bolts to avoid the possibility that the threads were worn adding to the problem. The guy who altered the landing gear didn't take note of my requirement for the front uprights to be shorter than the rear. I was aiming for a tilt of 2 degrees to lift the tail fin to be 60mm above the ground. It's actually 70mm so no problem there. However, the heli is now noticeably taller and doesn't work with my current arrangement for transport in my van. That's a minor problem in the greater scheme of things.
Here are a couple of photos, one with the heli sitting loosely on the new landing gear and the other of yours truly following the successful test. Next project will be beautification (the heli not me).
Attachments
 She's an awesome beast. The sound of those blades must roar
  Good luck with the maiden
Heliman450
Well-Known Member
Hi Tony, thanks for the adjective, my whole design concept was for chonky 
I was forced to use parts from SAB as Hugo specialises in them. I wanted a different distribution of parts around the frame, particularly the batteries and also the ESC's all of which didn't survive the 'emergency landing'. The six items were the majority of the cost of the rebuild. I was also impressed by a friend's Tron, which inspired me towards the overlapping frames. This gave the opportunity to better achieve the CoG as the rear batteries sit much further forwards. I'm also using shorter blades (800mm vs 850mm) partly forced by availability/cost but also the shorter tail boom to avoid a clash.
It took a while longer than I thought but the feeling of achievement when it lifted into the air was well worth it.
Heliman450
Well-Known Member
Chonkey has become my favourite word
DanielleMassey
New Member
Using standard parts and the SAB 700 RAW as a source has been a smart approach so far. It's also great to hear that your insurance payout has been helpful in covering the costs, and you're still in credit after paying your main supplier Hugo.Hi all, the inevitable has finally happened and my VR 880 is in need of a rebuild. As it isn't in production any longer, I'm looking forward to the challenge of getting it back into the air. Can't say how long it will take me but there isn't really any rush.
I produced a very useful mock-up using plywood and am expecting version #2 to be handed back tomorrow from a friend who's been helping out with the cutting/drilling in his workshop. Next phase is to mount all the electronics in their new location and to scope out the wiring runs before creating the CAD drawing for the new CF frames.
I've maximised the use of standard parts up to now and the SAB 700 RAW has been very good as a source. I'm expecting delivery of the new landing gear tomorrow so I can exercise the little grey cells on how to best join the top and bottom bits.
Up to now, I'm still in credit on the payout from my insurance company of just over $3,000 having paid out around $1,000 to my main supplier Hugo (Modellsport.ch | Startseite | Der Onlineshop).
If you want to learn more about your other components, you can refer to the Ask AI ChatGPT Mod APK application on the getmodnow website for more new information.
I'll keep you posted depending upon interest shown.
Please do keep us updated on your progress. Many people are interested in aircraft projects and would love to hear about your experiences and any challenges you encounter along the way. Good luck with the rest of the rebuild, and feel free to ask if you have any specific questions or need further assistance!
Heliman450
Well-Known Member
Hi there Danielle, thanks for the interest. Here's a link to my latest update. I started a new thread so that this one isn't going to end up pages long (lots to do).
 www.rc-help.com
My V-R 880 Rebuild - Next Phase
Hi all, having resurrected my smashed up Velos-Rotors 880 to a flying state, I'm looking to embark upon the next phase and fit retracts rather than the somewhat gawky land skid that now keeps it off the ground. I've located a supplier for the system but unfortunately they don't market a twin...
www.rc-help.com