My New Project

Smoggie

Well-Known Member
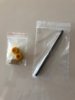
I'd personally dispense with the rubber mounts, not needed on an electric heli. What i do to fill the gap between the screw and the large hole in the servo mounting lug is to get some 4mm x 2.5mm plastic pneumatic tubing (available on eBay etc) and cut slices about 2mm long. Slip these over the screws, it takes up the gap and ensures that the servos mount precisely in the correct position.
 

Heliman450

Well-Known Member
Hi all, yesterday, the parts arrived from the USA and I was able to continue with the servo installation. As I suspected the rubber mountings pushed the alignment out and in combination with the holes on the arm, it was simply too far out. Currently, I'm looking into Steve's suggestion about replacing them with tubing of some sort, the favourite at the moment is a PVC option that is ID 3mm and OD 4mm. I need a 2.5mm long piece to fill the hole in the servo. Photos to follow when I make the decision.
 

Smoggie

Well-Known Member
Some photos of I make the spacers, it’s very quick and easy:
Take some 4mm od x 2.5mm id PVC pneumatic tube:
61A50DF7-BD6B-45E8-B02B-41B935D7C515.jpeg

Slice it into rings about 2 or 3mm long
D634A6D4-8F5B-469D-B7C1-061496B0BA46.jpeg

Slip the rings over the mounting screws:
8584B07D-1573-4015-BAEF-5A0F5294D42B.jpeg

the rings are a close fit in the servo mount lug holes which makes for an accurate mounting of the servo:
78420653-9803-4ECD-B026-30BA6CF9A6CE.jpeg
 
Last edited:

Heliman450

Well-Known Member
Exactly as I understood it would work. Ideally, I don't want to wait longer to get hold of the tubing, I think there is something buried in my store for things I might one day make use of.
 

Heliman450

Well-Known Member
Latest update in the photos below. I decided to go for a slightly different solution than the plastic tubing. Unfortunately, the tubing in my scrap drawer wasn't sized well for the job as the ID was small and the OD a little too big when the screw was fitted inside. At the moment, it's made up with small pieces of shrink-wrap tubing (2 x 4mm per screw), this was just right to hold on the screw and fit the hole.

The ball links were very tight and needed a bit of work to enlarge the hole slightly, at least they are a nice snug fit to start off with.

Screws_02.jpg Screws_01.jpg Servos_04.jpg
 

Heliman450

Well-Known Member
Hi all, not exactly to do with the build but rather an offshoot arising from the contact with Velos-Rotors. The package turned up and it contained some unlisted parts (photo). My inquiry resulted in Aris explaining and providing a link Single Spindle Head Review - HeliFreak where 'A Viking' (the house washing guy) has a very good thread relating to the optional solid rotor head spindle.

As I've had a 2-years' break from flying my helis, I'll have to relearn some of the skills involved so I'd appreciate any input the more experienced fliers on the finer details that seem to be presented about the 'feel' of the two types of spindle (split vs solid). I'm more a low head speed kind of guy with a boring flying style rather than anything approaching extreme 3D :bellyroll:. I think that for me the split version seems perfect but who knows, maybe I'll become the oldest 'Tick-Tocker' in town some day :chickendance:
 

Attachments

  • 880 Parts_01.jpg
    880 Parts_01.jpg
    126.9 KB · Views: 3

Smoggie

Well-Known Member
Interesting. I think any difference in performance is probably more to do with the hardness of the dampers rather than the single 'floating' shaft vs dual spindle shaft design. The main advantage of the dual shaft design is that the spindles are controlled in what direction they can move by their pivot (up and down only). This allows softer dampers to be use while still preventing unwanted movement of the spindle shafts. Some heads ( Henseleit TDR and SoXos Strike 7 for example) have a single shaft but have a 'see-saw' pivot in the middle that the shaft passes through, this achieves the same design goal as the dual shaft design.

The conventional 'floating' spindle shaft that is free to move in all directions works just fine as long as quite hard dampers are used so as to keep it's movement under control. I suspect that the dampers supplied with the single floating type shaft will be harder than the ones used with the dual shafts (check them and see if this is the case).
  • Soft dampers: Reduced vibrations, smoother response and reduce oscillation at low headspeeds
  • Hard dampers: Better at higher headspeed and give more immediate and aggressive cyclic response.
Some heads these days have adjustable damping so you can tune to your preference. Sadly my 'dumb thumbs' are not sophisticated enough to notice the difference unless the change is drastic.

To answer your final question, if it were me I'd try the dual shafts with softer dampers first. It should be possible to fit the hard dampers to the dual shafts anyway if you wanted to try them out. Other than saving parts count / complexity I dont really see an actual advantage in the single floating shaft in itself.
 
Last edited:

Heliman450

Well-Known Member
Hi Steve, 'dumb thumbs' is a good one, however, if yours are 'dumb' then I'm not sure who would be the person to call with an opinion on it. I've recently made the leap to being able to 'feel' the difference between settings and coordinate my 'dead thumbs' to make the business end do what I want. Personally, I think any 'feel' that goes further than that is more likely to be BS rather than anything real.

With that somewhat provocative statement I'll wait until the others come forward.
 

Heliman450

Well-Known Member
Hi all,

Latest update is that I've been progressing slower than I expected on my new build mainly due to sorting things after the lockdown and over 2-years absence. My latest target is to have it in the air before my birthday in September (finger crossed).

I just got my new landing skids that address the problem of not having enough clearance on the tail fin. Velos Rotors didn't have any alternatives having given up the hobby models three years ago. The new version is made out of 4mm carbon sheet instead of 3mm and they are significantly bigger at 44.0cm long with a 2cm lift on the rear. This results in 6cm clearance and no tendency to drop when loaded up with the batteries. The tail also has 5 degrees angle and the heli looks extra good now.

Once the 3-bladed tail was built and added, the heli proved massively tail heavy. Moving the batteries as far forward as possible didn't cover the required weight distribution change. I needed a longer (and heavier) battery tray to allow me to move the forward batteries to the limit and stay within the confines of the canopy. The CoG has moved forward by about 2.5cm and is now within 0.5cm of the main rotor shaft. When I crack the next challenge of getting the swash plate to do what I want, I'll return to address what to do to balance her up. Some photos attached.
 

Attachments

  • Battery Tray_01.jpg
    Battery Tray_01.jpg
    111.8 KB · Views: 5
  • 880 Skid Dimensions.jpg
    880 Skid Dimensions.jpg
    127 KB · Views: 5
  • Landing Gear_06.jpg
    Landing Gear_06.jpg
    100.6 KB · Views: 5
  • Landing Gear_07.jpg
    Landing Gear_07.jpg
    104.3 KB · Views: 6

D.O.G.

Goblin 380 Supporter
Oh wow heliman450. That bird is a beast with 2 motors and 3 batteries. It's coming alone very nicely :). Thanks for sharing, keep the pics coming and good luck on the rest of the build. Hope all comes out well.
 

Heliman450

Well-Known Member
Oh wow heliman450. That bird is a beast with 2 motors and 3 batteries. It's coming alone very nicely :). Thanks for sharing, keep the pics coming and good luck on the rest of the build. Hope all comes out well.
Hi D.O.G., there're 4x6S batteries (2x12S). I only need the two at the back for the setting up leaving two spares (just in case) :arms:
 

Heliman450

Well-Known Member
Hi again, close of the day is that one of the brand new cyclic servos is binding. I must get in touch with my supplier. Initially, I thought that it was me until I eventually chased it down. Let you know how it goes.
 

Heliman450

Well-Known Member
So, today saw the maiden flight go off with no hitches apart from making possibly the worst video ever using my mobile phone propped up in my rucksack. I needed to make a few adjustments to the settings and carry out a few cosmetic improvements. This afternoon was simply too hot to return to the helipad (34DegC!) so tomorrow afternoon looks more likely although the forecast of rain to finish around midday will play a major role in it.

I'm pleased that I managed to get the bird in the air before the anniversary due in September. It's been a long road and a major challenge on a number of counts. I think my most sensible decision was to invest in the new landing skids, which were fortunately able to be custom built with the help of my friend from the flying club. Without his input, I'm sure I'd be looking at a failed maiden flight as the original 3mm was just not strong enough and overall, not big enough. I fitted the Velo-Rotors aluminium 'strengthening' strips so it at least looks pretty on top of the much stronger skids.

Bye for now!
 

Heliman450

Well-Known Member
Hi all,

Here's the link to the second part of yesterday's maiden. A little better than the first part but not so well centred due to me hovering a bit too much to the left from my perspective. I'm expecting to return for part #3 asap.

Link:
 
Top Bottom