Projects Playing with a Spektrum AR636

LooseNut

Active Member
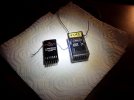
Spent a little time and made up the plate tonight based on the picture that was shown in the Canada RC forum.
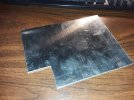
The Aluminum plate is .125" (1/8" or 3.1mm) 6061-T6, I have the plate on hand for doing stuff like this, but I'm sure you could use the Aluminum strap of the same thickness available at a local homebuilding outlet or Hardware store. The key here is the mass that will dampen and shift the resonance the Rx is seeing.
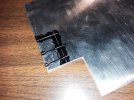
An easy layout is shown in the second picture. I cut it out with a hacksaw, squared it up with a hand file and used a needle file to make the cutouts for the Rx bottom screws. They are just in case you need to open it up at a later date. As with the OP on the CRC forum, I intend to epoxy it on, so the choice is yours on the notches.
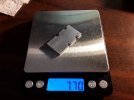
Once the notches were in I weighed it to see where I was with weight and then started the tinkery task of filing down the extra weight. Since I had filed the width to the same as the Rx, I gradually took metal off the long end (ref from the notches) until I got the weight where I wanted. 7.70 grams on the nose. :)
Now to rough up the glue area, clean the Rx bottom and scuff it so I can apply a thin layer of 20 minute Epoxy.
I like to apply a very thin coat to both surfaces. That method ensures adhesive is on both surfaces when you put it together. Thin being key so you don't have a bunch of squeeze out.
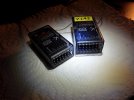
Ta Daaaa!
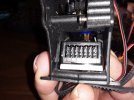
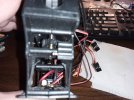
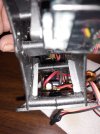
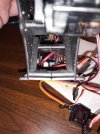
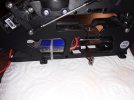
Ok, now to take things apart so I can put them back together. The Torture of development. Hahaha!
 

Attachments

  • 20220730_190137 a.jpg
    20220730_190137 a.jpg
    168 KB · Views: 3
  • 20220730_193150 a.jpg
    20220730_193150 a.jpg
    180.3 KB · Views: 3
  • 20220730_204438 a.jpg
    20220730_204438 a.jpg
    102.9 KB · Views: 3

LooseNut

Active Member
Well, if you've stayed with the project this long, maybe you are thinking if I get it figured out you'll try it. Good luck to both of us. Ha!
What you will need to do if you are going to use a B400 is make some room for the Rx.
There's 2 ways to go about it. One is moving the ESC to the rear and putting the AR636 up front. I decided from the first I needed access to the Rx plugs for the work ahead, so my choice was made to put the Rx where the old one was.
Pic #1 is a shot from the left side showing the stock ESC location.
Pic #2 shows the size difference between the AR6100e and the AR636 with the Aluminum plate added.
Pic #3 shows the height difference between the Stock AR636 and the one with the plate added.
Pic #4 shows the webs that have to be opened up so the Rx fits.
Pic #5 shows where I marked the webs to have material removed.
Pic #6 shows the webs after a minute using the Dremel with a 3/8" dia sanding barrel and cleaning up the lower corners with an Axacto knife.
Pic#7 shows the AR636 sitting in the frame checking for clearance of the Double sided Foam tape.
There has to be enough clearance around the Rx so it is isolated from the frame vibrations. and as you can see, it's very easy to get to the plugs.
I had origionally clear the webs for the RX, but after adding the 1/8" Aluminum, I needed more clearance. It also reminded me to post this information. :)
 

Attachments

  • 20220801_201429 A.jpg
    20220801_201429 A.jpg
    130.2 KB · Views: 3
  • 20220801_200723 A.jpg
    20220801_200723 A.jpg
    101.5 KB · Views: 4
  • 20220801_200849 A.jpg
    20220801_200849 A.jpg
    101 KB · Views: 4
  • 20220801_201049 A.jpg
    20220801_201049 A.jpg
    147.5 KB · Views: 4
  • 20220801_201227 A.jpg
    20220801_201227 A.jpg
    118.6 KB · Views: 4
  • 20220801_202123 A.jpg
    20220801_202123 A.jpg
    137.9 KB · Views: 4
  • 20220801_202258 A.jpg
    20220801_202258 A.jpg
    135.5 KB · Views: 4

LooseNut

Active Member
What started as an afternoon whim to see what could be done has taken on a life of it's own.
After the last debacle of a flight, the mains hit the tips on the ground enough to put a minor bend in the main shaft and take out the feathering shaft. Not a big whoop to anyone that flies a Heli, everyone's bent those before. The blades, Tail and Main, are being replaced since they all got chewed up a bit. All in all, the rest of the bird is fine.
Digging through the parts box I have blades and a feathering shaft. I'll make another Main shaft.
As outlined above, I made the plate as discussed on the CRC forum and it's mounted back in the frame. I had to shave the bottom of the 3rd bearing housing to create clearance for the Rx once I fitted it with the foam tape.
There is enough thickness there, so not a problem. It got me thinking though, so I started drawing up a new bottom case in Fusion. Can't just buy them since they've never been offered separately. Next is a little programming in M CAM and I'll make a couple up. Extravagance, I know, but what the heck.
We don't even know if it makes a difference yet?!?! Ha!, Yup, Loosenut.
I did fall down the Rabbit hole chasing info on programming and particulars to the AR636 and found even more info to chase and consider. It is after all, the internet. You can't believe everything that's posted. Including what I'm telling you! :) But hey! I'll give you the straight poop that I find, even if it's a total fail.
Budget wise, I still have practically nothing in it since I've been rooting through my Swap boxes and making parts. I think the goal when it/if I make it all work should be that it can be done under $200. That's about what's you pay for a Micro Brain and a Rx or equivalent that is intended to do the job and a few repair parts for a beat up used Heli.
 

LooseNut

Active Member
Wow! Where did summer go? Got a little busy with work and boom it was gone!
I did manage to get the Aluminum Rx bottoms made, Little run of 10 to get a handle on things. Turns out I have 5 kicking around here and my brother has one too.
I'm sure next time I come for air it will be snowing or something. Ha! I'll try to get something going before then.
Here's a picture of the bunch and a Rx wearing one.
 

Attachments

  • 20220921_165406 S.jpg
    20220921_165406 S.jpg
    175.9 KB · Views: 5

Tony

Staff member
Those cases look great. Are you using anything to mitigate grounding out? Or just making sure the pins are short enough?
 

LooseNut

Active Member
Just like the originals, the lugs are stepped so the traces near the lugs don't short. Aside from that, there is plenty of clearance from the pins to case.
Would be easy enough to install a piece of thin Mica to insulate the bottom.
When I drew up the model, I got the chance to measure a stock Alum case and compare it with the stock plastic one. These are just a copy of the original. Turns out that the "7 grams" is basically the Alum lower case identical to the plastic one that it had. Where they benefit is the difference in resonance between the two materials.
 

Tony

Staff member
Right on. when I saw it the first thing that popped in my head was shorting issues, and I guess it is still there if it's under power when you in stall it, but who would do that.... But then again, they do have a warning label on a hair dryer to "not use in shower".... LOL. Sorry, had to make a joke. But yea, that case looks great. Any plans to anodize some of them?
 

LooseNut

Active Member
Ha! I wonder how many read that warning label?
I hadn't planned on anodize, but we send stuff out all the time, mostly for Green. Occasional Black. I suppose if my inbox got flooded with folks wanting them I could get the anodize done and make a die for punching mica insulators..... ya know, for the folks that might use the hair dryer in the shower.
 
Top Bottom